
In this blog post, I will guide you through creating a Windows Server 2022 image based on the original ISO file with Hyper-V and upload it as a generalized disk to Azure. Once we’ve uploaded it, we will create a managed image from it.
The reason
Since the current Azure Gallery image for Windows Server 2022 is on a previous release version which still contains a couple of bugs. I want to go ahead and test the latest Windows Insider built to see how it behaves and works in combination with Windows Virtual Desktop.
High level process steps and why I did it like this?
My initial idea was to create an image running on a client-hyper-v on Windows 10. This wasn’t the best idea.. uploading the image would take a reasonable amount of time and bandwidth.
The second option was building a nester hyper-v virtual machine on Azure. This would speed up my upload time and put the bandwidth pressure on the Azure side and not my local workstation. Last but not least, I could easily put some more power into the machines without impacting my local performance.
Low level step by step process
How to create a nested hyper-v host on Azure?
Not all virtual machine series support nested virtualization on Azure. Please read the recommendations thoroughly on the Azure Docs site.
In my case, I went for a D8s_v3 series with a 1TB data disk. Since this would only be a temporary solution until I’ve built and captured my Windows Server 2022 image, I didn’t look for a smaller size. I just wanted it to faster :D.
So what I did, I created a new Windows Server 2019 host based upon the Azure Marketplace image.
Once I spun up the virtual machine, I ran the following script to set up and configure the Hyper-V services. Feel free to fork it or download it from my GitHub repo.
1 2 3 4 5 6 7 8 9 10 11 12 13 | #region Install Hyper-V role$OSVersion = (Get-WmiObject -class Win32_OperatingSystem).CaptionIf ($OSVersion -like "*Server*") { Write-Host "Working on Windows Server OS" Install-WindowsFeature -Name Hyper-V -IncludeAllSubFeature -IncludeManagementTools}else { Write-Host "Working on Windows Client OS" Enable-WindowsOptionalFeature -Online -FeatureName Microsoft-Hyper-V -All}#endregion |
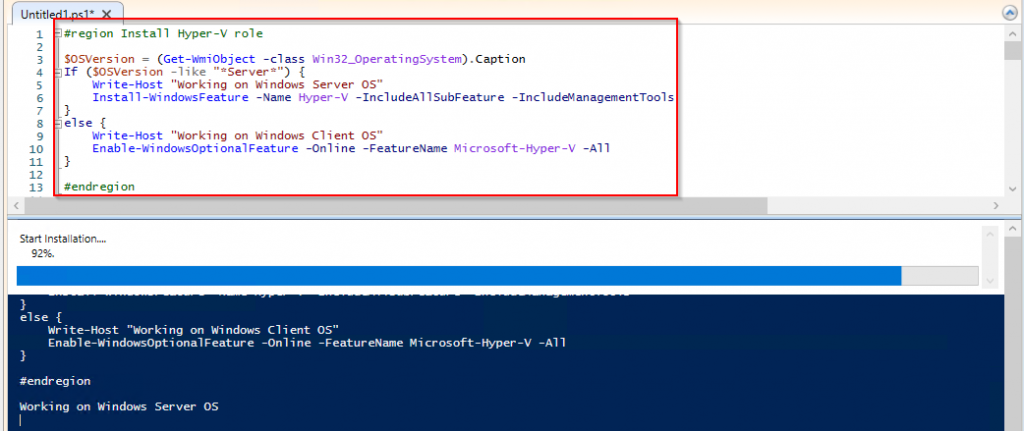
The hyper-v role has now been installed, please reboot the virtual machine prior to continuing with the next section.

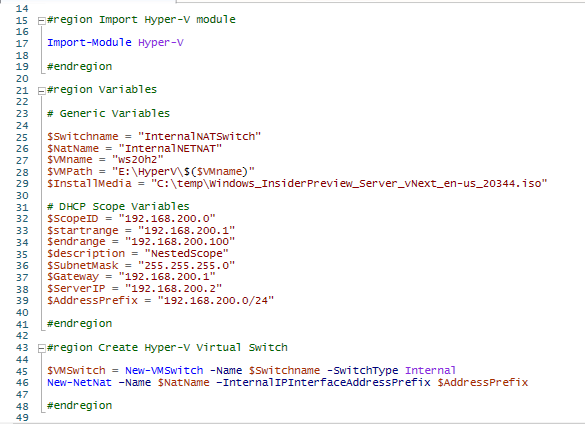
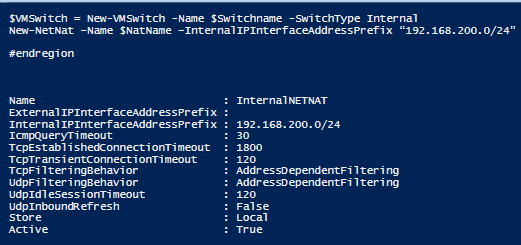
After the reboot, it’s time to configure our virtual network switches to provide internal and external network connectivity to the nest virtual machine. First we need to import the Hyper-V PowerShell module and define some variables.
You can download the latest Windows Server 2022 ISO from here.
1 2 3 4 5 6 7 8 9 10 11 12 13 14 15 16 17 18 19 20 21 22 23 24 25 26 27 28 29 30 31 32 33 34 | #region Import Hyper-V moduleImport-Module Hyper-V#endregion#region Variables# Generic Variables$Switchname = "InternalNATSwitch"$NatName = "InternalNETNAT"$VMname = "ws20h2"$VMPath = "C:\HyperV\$($VMname)"$DownloadURI = "<link to download location>"$InstallMedia = "<link to ISO file>"# DHCP Scope Variables$ScopeID = "192.168.200.0"$startrange = "192.168.200.1"$endrange = "192.168.200.100"$description = "NestedScope"$SubnetMask = "255.255.255.0"$Gateway = "192.168.200.1"$ServerIP = "192.168.200.2"$AddressPrefix = "192.168.200.0/24"#endregion#region Create Hyper-V Virtual Switch$VMSwitch = New-VMSwitch -Name $Switchname -SwitchType InternalNew-NetNat –Name $NatName –InternalIPInterfaceAddressPrefix $AddressPrefix#endregion |
How to create a nested hyper-v virtual machine?
Now that we have our Hyper-V host up and running, it’s time to create our Virtual Machine. The following script section will help you out in creating the VM. The script will enable the DHCP role on your Hyper-V host so it can provide local IP addresses to the nested virtual machines.
1 2 3 4 5 6 7 8 9 10 11 12 13 14 15 16 17 18 19 20 21 22 23 24 25 26 27 28 29 30 31 32 33 34 35 36 | #region Create New VMNew-VM -Name $VMname -MemoryStartupBytes "2147483648" -Path $VMPath -SwitchName $switchname -NewVHDSizeBytes 128GB -NewVHDPath "$VMPath.vhdx"#endregion#region Add DVD Drive to Virtual MachineAdd-VMScsiController -VMName $VMNameAdd-VMDvdDrive -VMName $VMName -ControllerNumber 1 -Path $InstallMedia#endregion#region Mount Installation Media$DVDDrive = Get-VMDvdDrive -VMName $VMName | Where-Object { $_.DvdMediaType -like "ISO" }#endregion#region DHCP install and configuration#Add DHCP Role to the server to provision IP addresses for your Nested virtual machinesAdd-WindowsFeature -Name DHCP -IncludeAllSubFeature -IncludeManagementTools# Add DHCP Scope and Options$Scope = Add-DhcpServerv4Scope -StartRange $startrange -EndRange $endrange -Description $description -SubnetMask $SubnetMask -Name $descriptionSet-DhcpServerv4OptionValue -value $gateway -optionId 3 -ScopeId $ScopeID#endregion#region Assign the network adapter with an IPGet-NetAdapter "vEthernet ($Switchname)" | New-NetIPAddress -IPAddress $startrange -AddressFamily IPv4 -PrefixLength 24#endregion |

After you have successfully booted the virtual machine, run the last section to provide an IP and internet access. Replace the variables with the variables you selected at the beginning of the script.
1 2 3 | # Once you have your VM up and running you can run this within the VMGet-NetAdapter "Ethernet" | New-NetIPAddress -IPAddress $ServerIP -DefaultGateway $Gateway -AddressFamily IPv4 -PrefixLength 24Netsh interface ip add dnsserver “Ethernet” address=8.8.8.8 |
How to build an offline Windows Server 2022 image?
Microsoft provides some recommendations on creating an offline image to then later upload it to Azure.
I’ve gathered all of the required sections and added some additional optimizations. You can run the following script or download it from my GitHub repo.
1 2 3 4 5 6 7 8 9 10 11 12 13 14 15 16 17 18 19 20 21 22 23 24 25 26 27 28 29 30 31 32 33 34 35 36 37 38 39 40 41 42 43 44 45 46 47 48 49 50 51 52 53 54 55 56 57 58 59 60 61 62 63 64 65 66 67 68 69 70 71 72 73 74 75 76 77 78 79 80 81 82 83 84 85 86 87 88 89 90 91 92 93 94 95 96 97 98 99 100 101 102 103 104 105 106 107 108 109 110 111 112 113 114 115 116 117 118 119 120 121 122 123 124 125 126 127 128 129 130 131 132 133 134 135 136 137 138 139 140 141 142 143 144 145 146 147 148 149 150 151 152 153 154 155 156 157 158 159 160 161 162 163 164 165 166 167 | #This script is intended to run on the machine you are going to sysprep and capture as a local VHD(x)#region VM prepfunction confirm-path { Param ([string]$templocation) $Path = Test-Path $templocation If ($Path -eq $true) { Write-Host "The $($templocation) path already exists, no need to create one" -ForegroundColor Cyan } Else { Write-host "We are creating a temp directory $($templocation)" -ForegroundColor Cyan $DontShow = mkdir $templocation }}function PrepareVM { Write-host "Performing Windows File System Check" sfc.exe /scannow Write-host "Displaying Persistent Routes" $routes = route.exe print Write-Host "Removing Static Routes" #route.exe delete * Write-Host "Removing WinHTTP proxy" netsh.exe winhttp reset proxy Write-Host "Configuring SAN policy" start-process diskpart.exe -ArgumentList "san policy=onlineall exit" Write-Host "Configuring time zone" Set-ItemProperty -Path HKLM:\SYSTEM\CurrentControlSet\Control\TimeZoneInformation -Name RealTimeIsUniversal -Value 1 -Type DWord -Force Set-Service -Name w32time -StartupType Automatic Write-Host "Set powerprofile to high performance" powercfg.exe /setactive SCHEME_MIN Write-Host "Setting default temp variables" Set-ItemProperty -Path 'HKLM:\SYSTEM\CurrentControlSet\Control\Session Manager\Environment' -Name TEMP -Value "%SystemRoot%\TEMP" -Type ExpandString -Force Set-ItemProperty -Path 'HKLM:\SYSTEM\CurrentControlSet\Control\Session Manager\Environment' -Name TMP -Value "%SystemRoot%\TEMP" -Type ExpandString -Force Write-host "Checking windows services" Get-Service -Name BFE, Dhcp, Dnscache, IKEEXT, iphlpsvc, nsi, mpssvc, RemoteRegistry | Where-Object StartType -ne Automatic | Set-Service -StartupType Automatic Get-Service -Name Netlogon, Netman, TermService | Where-Object StartType -ne Manual | Set-Service -StartupType Manual Write-Host "Setting remote access settings" Set-ItemProperty -Path 'HKLM:\SYSTEM\CurrentControlSet\Control\Terminal Server' -Name fDenyTSConnections -Value 0 -Type DWord -Force Set-ItemProperty -Path 'HKLM:\SOFTWARE\Policies\Microsoft\Windows NT\Terminal Services' -Name fDenyTSConnections -Value 0 -Type DWord -Force Set-ItemProperty -Path 'HKLM:\SYSTEM\CurrentControlSet\Control\Terminal Server\Winstations\RDP-Tcp' -Name PortNumber -Value 3389 -Type DWord -Force Set-ItemProperty -Path 'HKLM:\SYSTEM\CurrentControlSet\Control\Terminal Server\Winstations\RDP-Tcp' -Name LanAdapter -Value 0 -Type DWord -Force Set-ItemProperty -Path 'HKLM:\SYSTEM\CurrentControlSet\Control\Terminal Server\WinStations\RDP-Tcp' -Name UserAuthentication -Value 1 -Type DWord -Force Set-ItemProperty -Path 'HKLM:\SYSTEM\CurrentControlSet\Control\Terminal Server\WinStations\RDP-Tcp' -Name SecurityLayer -Value 1 -Type DWord -Force Set-ItemProperty -Path 'HKLM:\SYSTEM\CurrentControlSet\Control\Terminal Server\WinStations\RDP-Tcp' -Name fAllowSecProtocolNegotiation -Value 1 -Type DWord -Force Set-ItemProperty -Path 'HKLM:\SOFTWARE\Policies\Microsoft\Windows NT\Terminal Services' -Name KeepAliveEnable -Value 1 -Type DWord -Force Set-ItemProperty -Path 'HKLM:\SOFTWARE\Policies\Microsoft\Windows NT\Terminal Services' -Name KeepAliveInterval -Value 1 -Type DWord -Force Set-ItemProperty -Path 'HKLM:\SYSTEM\CurrentControlSet\Control\Terminal Server\Winstations\RDP-Tcp' -Name KeepAliveTimeout -Value 1 -Type DWord -Force Set-ItemProperty -Path 'HKLM:\SOFTWARE\Policies\Microsoft\Windows NT\Terminal Services' -Name fDisableAutoReconnect -Value 0 -Type DWord -Force Set-ItemProperty -Path 'HKLM:\SYSTEM\CurrentControlSet\Control\Terminal Server\Winstations\RDP-Tcp' -Name fInheritReconnectSame -Value 1 -Type DWord -Force Set-ItemProperty -Path 'HKLM:\SYSTEM\CurrentControlSet\Control\Terminal Server\Winstations\RDP-Tcp' -Name fReconnectSame -Value 0 -Type DWord -Force Set-ItemProperty -Path 'HKLM:\SYSTEM\CurrentControlSet\Control\Terminal Server\Winstations\RDP-Tcp' -Name MaxInstanceCount -Value 4294967295 -Type DWord -Force if ((Get-Item -Path 'HKLM:\SYSTEM\CurrentControlSet\Control\Terminal Server\WinStations\RDP-Tcp').Property -contains 'SSLCertificateSHA1Hash') { Remove-ItemProperty -Path 'HKLM:\SYSTEM\CurrentControlSet\Control\Terminal Server\WinStations\RDP-Tcp' -Name SSLCertificateSHA1Hash -Force } Write-Host "Configuring Firewall Rules" Set-NetFirewallProfile -Profile Domain, Public, Private -Enabled True Enable-PSRemoting -Force Set-NetFirewallRule -DisplayName 'Windows Remote Management (HTTP-In)' -Enabled True Set-NetFirewallRule -DisplayGroup 'Remote Desktop' -Enabled True Set-NetFirewallRule -DisplayName 'File and Printer Sharing (Echo Request - ICMPv4-In)' -Enabled True New-NetFirewallRule -DisplayName AzurePlatform -Direction Inbound -RemoteAddress 168.63.129.16 -Profile Any -Action Allow -EdgeTraversalPolicy Allow New-NetFirewallRule -DisplayName AzurePlatform -Direction Outbound -RemoteAddress 168.63.129.16 -Profile Any -Action Allow }function FinalCheckVM { Write-host "Checking Boot Configuration Data Settings" bcdedit.exe /set "{bootmgr}" integrityservices enable bcdedit.exe /set "{default}" device partition=C: bcdedit.exe /set "{default}" integrityservices enable bcdedit.exe /set "{default}" recoveryenabled Off bcdedit.exe /set "{default}" osdevice partition=C: bcdedit.exe /set "{default}" bootstatuspolicy IgnoreAllFailures #Enable Serial Console Feature bcdedit.exe /set "{bootmgr}" displaybootmenu yes bcdedit.exe /set "{bootmgr}" timeout 5 bcdedit.exe /set "{bootmgr}" bootems yes bcdedit.exe /ems "{current}" ON bcdedit.exe /emssettings EMSPORT:1 EMSBAUDRATE:115200 Write-host "Enabling dump log" # Set up the guest OS to collect a kernel dump on an OS crash event Set-ItemProperty -Path 'HKLM:\SYSTEM\CurrentControlSet\Control\CrashControl' -Name CrashDumpEnabled -Type DWord -Force -Value 2 Set-ItemProperty -Path 'HKLM:\SYSTEM\CurrentControlSet\Control\CrashControl' -Name DumpFile -Type ExpandString -Force -Value "%SystemRoot%\MEMORY.DMP" Set-ItemProperty -Path 'HKLM:\SYSTEM\CurrentControlSet\Control\CrashControl' -Name NMICrashDump -Type DWord -Force -Value 1 # Set up the guest OS to collect user mode dumps on a service crash event $key = 'HKLM:\SOFTWARE\Microsoft\Windows\Windows Error Reporting\LocalDumps' if ((Test-Path -Path $key) -eq $false) { (New-Item -Path 'HKLM:\SOFTWARE\Microsoft\Windows\Windows Error Reporting' -Name LocalDumps) } New-ItemProperty -Path $key -Name DumpFolder -Type ExpandString -Force -Value 'C:\CrashDumps' New-ItemProperty -Path $key -Name CrashCount -Type DWord -Force -Value 10 New-ItemProperty -Path $key -Name DumpType -Type DWord -Force -Value 2 Set-Service -Name WerSvc -StartupType Manual Write-host "Setting WMI" winmgmt.exe /verifyrepository Write-Host "Checking services listening on port 3389" netstat.exe -anob get-appxpackage | Where-Object { $_.Name -like "*Edge*" } | Remove-AppxPackage } function install-azurewindowsagent { param( [Parameter()] [string] $OutputWebSocket, [Parameter()] [string] $Logfile ) msiexec /i $OutputWebsocket /l*v $Logfile /passive /q}$templocation = "C:\temp"$OutputWebsocket = "$templocation\AzureWindowsAgent.msi"$Logfile = $templocation + "\logfile.txt"confirm-path $templocationWrite-Host "Starting Prepare VM phase" -ForegroundColor GreenPrepareVMWrite-Host "Starting Final Check VM phase" -ForegroundColor GreenFinalCheckVMWrite-Host "Installing Azure VM Agent" -ForegroundColor Green(New-Object System.Net.WebClient).DownloadFile($windowsagentdownloaduri, $OutputWebsocket)install-azurewindowsagent -OutputWebSocket $OutputWebsocket -Logfile $LogfileWrite-Host "Script complete ready for sysprep" -ForegroundColor Green |

Now that we have optimized our Windows Server 2022 VM, it’s time to give it a reboot and Sysprep.
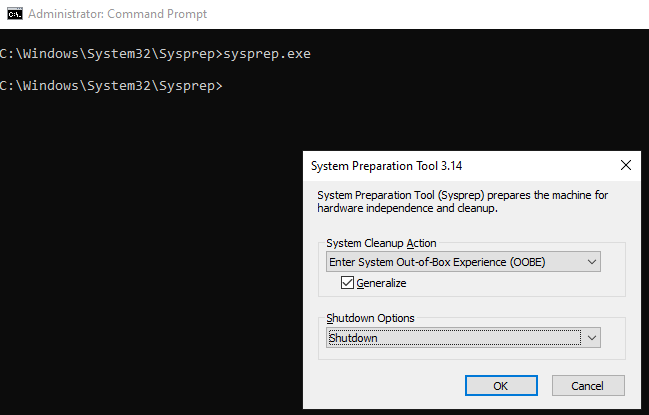
As soon as the VM has been shut down, you can safely delete the virtual machine from the Hyper-V manager. Your disk will be kept intact.
How to upload an offline Windows Server 2022 image to Azure
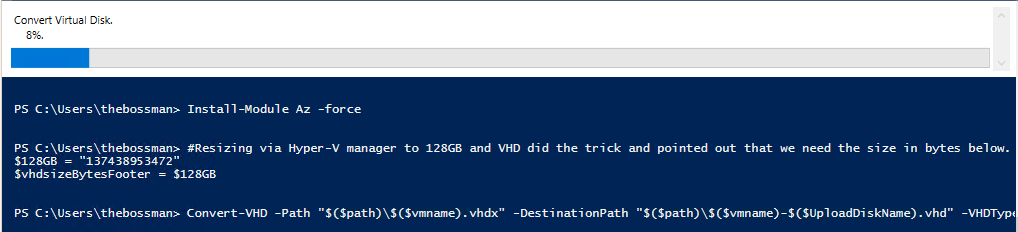
We can now use our Windows Server 2022 VHD(X) file to convert it to an Azure capable disk. I’ve written a small script to “automate” this process. The following Microsoft Docs article provides some reference information. It’s best to run this from the Hyper-V host where you created the VM.
You can download the script below from the following GitHub repo.
1 2 3 4 5 6 7 8 9 10 11 12 13 14 15 16 17 18 19 20 21 22 23 24 25 26 27 28 29 30 31 32 33 34 35 36 37 38 39 40 41 42 43 44 45 46 47 48 49 50 51 52 53 54 55 56 57 58 59 60 61 62 63 64 65 66 67 68 69 70 71 72 73 74 75 76 77 78 79 80 81 82 83 84 85 86 87 88 89 90 91 92 93 94 95 96 97 98 99 100 101 102 103 104 105 106 107 108 109 110 111 112 113 | #region supporting functionsfunction confirm-path { Param ([string]$templocation) $Path = Test-Path $templocation If ($Path -eq $true) { Write-Host "The $($templocation) path already exists, no need to create one" -ForegroundColor Cyan } Else { Write-host "We are creating a temp directory $($templocation)" -ForegroundColor Cyan $DontShow = mkdir $templocation }}#endregion#region Variables# Virtual Machine Name or Virtual Disk name (without .vhd(x))$VMname = Read-Host "Enter a VM name"# File location of your VHD(X) files$path = "F:\"# Download Location for AzCopy$templocation = "C:\Temp"# Diskname of the converted disk (local)$UploadDiskName = "tpldisk"# Resource Group Name where you will be uploading the managed disk$rgname = "yannickd-win2022-wvd"# Diskname of the Azure Managed Disk (Azure)$diskname = "ws2022templatediskv05"# Image Name of the Azure Managed Image you want to create$imageName = "WS2022_Image"# Region or Location$location = "westeurope"#endregion#region prerequisites#Download AZCopy$AzCopyDownloadLocation = "$templocation\AzCopy.zip"$AZCopyLocation = "$templocation\AzCopy"$Logfile = $templocation + "\logfile.txt"confirm-path $templocation(New-Object System.Net.WebClient).DownloadFile($AzCopyWin64DownloadURI, $AzCopyDownloadLocation)confirm-path $AZCopyLocation$shell = New-Object -ComObject Shell.Application$zipFile = $shell.NameSpace($AzCopyDownloadLocation)$destinationFolder = $shell.NameSpace("$AZCopyLocation")$copyFlags = 0x00$copyFlags += 0x04 # Hide progress dialogs$copyFlags += 0x10 # Overwrite existing files$destinationFolder.CopyHere($zipFile.Items(), $copyFlags)$AzCopyPath = dir $AZCopyLocation$AzCopyDirectory = $AZCopyLocation + "\" + $AzCopyPath.Name$env:Path += ";$($AzCopyDirectory)" #Download / Import AZPoShCmdletsImport-Module Az#Import Hyper-V PoshCMDletsImport-Module Hyper-V#endregion#region Convert the disk to a fixed size and vhd format#Resizing via Hyper-V manager to 128GB and VHD did the trick and pointed out that we need the size in bytes below. Change the size if you require a different OS disk size.$128GB = "137438953472"$vhdsizeBytesFooter = $128GB# Convert-VHD will convert the existing Dynamic VHDX file into a Fixed VHD fileConvert-VHD -Path "$($path)\$($vmname).vhdx" -DestinationPath "$($path)\$($vmname)-$($UploadDiskName).vhd" -VHDType Fixed# Resize-VHD will resize the VHD file to the size defined in the previous variable, this must be a Multiple of MiB, 137438953472 is the size in bytes required to upload a 128GB diskResize-VHD -Path "$($path)\$($vmname)-$($UploadDiskName).vhd" -SizeBytes $vhdsizeBytesFooter# Since there is a difference between Filesize, Size & DiskSize we get the latest lenght of the disk we have just resized. This size will be re-used when creating the disk in Azure$SourceSize = (Get-Item "$($path)\$($vmname)-$($UploadDiskName).vhd").Length#endregion#region Create Target Disk in Azure# Login to your Azure AccountLogin-AzAccount# Select your Azure Subscription$Subscription = Get-AzSubscription | Out-GridView -Title "Select the Azure Subscription you want to use" -PassThruSet-AzContext -Subscription $Subscription.id# Select your Azure Resource Group$ResourceGroup = Get-AzResourceGroup | Select ResourceGroupName,Tags,Location | Out-GridView -title "Select the Azure Resource Group you want to use" -PassThru$rgname = $ResourceGroup.ResourceGroupName# Configure the Target Disk on Azure$diskconfig = New-AzDiskConfig -SkuName 'Standard_LRS' -OsType 'Windows' -UploadSizeInBytes "$($SourceSize)" -Location 'westeurope' -CreateOption 'Upload' -HyperVGeneration '1'New-AzDisk -ResourceGroupName $rgname -DiskName $diskname -Disk $diskconfig#endregion#region Upload Disk to Azure# Generate a SAS token with Write Permissions and upload with AZ Copy$diskSas = Grant-AzDiskAccess -ResourceGroupName $rgname -DiskName $diskname -DurationInSecond 86400 -Access 'Write'AzCopy.exe copy "$($path)\$($vmname)-$($UploadDiskName).vhd" $diskSas.AccessSAS --blob-type PageBlob#endregion |
During the conversion of the disk a new VHD will be created with a fixed size.
During the upload process you will see at which speed the disk will try to upload.

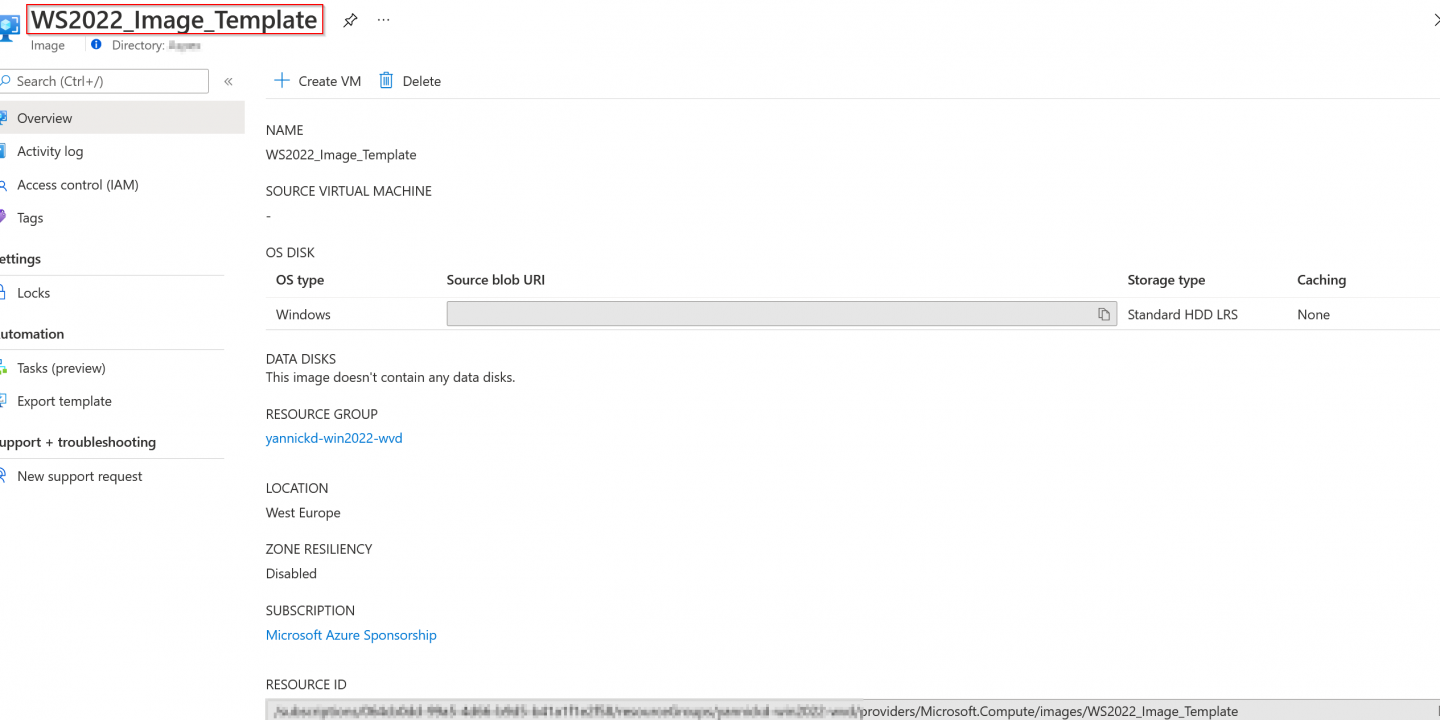
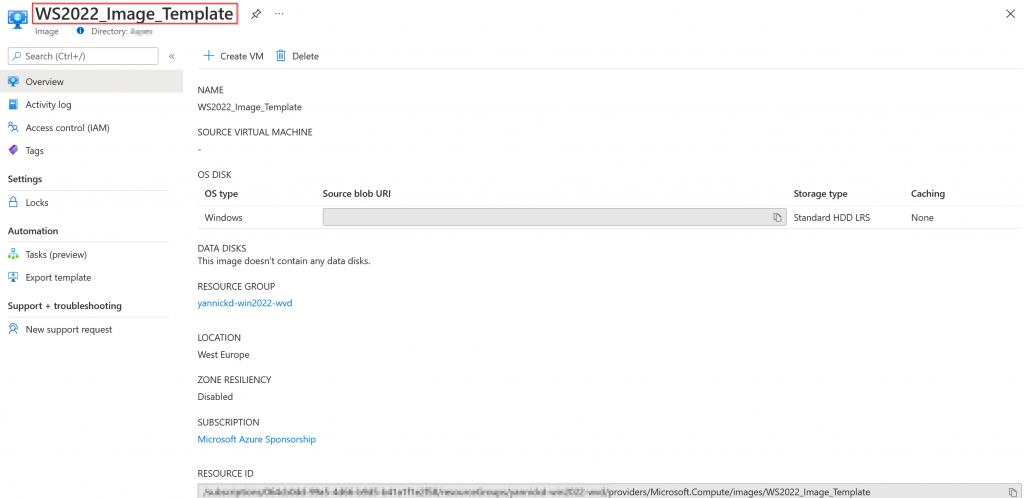
How to create an image from a managed disk
We now have a managed disk in Azure. From this point on, we can convert it to a managed image. Please run the following script section to convert it to an image.
1 2 3 4 5 6 7 8 9 10 11 12 13 14 15 16 17 18 19 20 21 | #region Create Image from Disk# Select the template Disk that you have uploaded$Disk = Get-AzDisk | where-object {$_.ResourceGroupName -like "$($rgName)"} | Out-GridView -PassThru# Retrieve the Disk ID of the template Disk$diskID = $disk.Id# Create a new image config$imageConfig = New-AzImageConfig -Location $location# Set the Azure Image OS Disk configuration$imageConfig = Set-AzImageOsDisk -Image $imageConfig -OsState Generalized -OsType Windows -ManagedDiskId $diskID# Revoke Disk AccessRevoke-AzDiskAccess -ResourceGroupName $rgname -DiskName $diskname# Create the actual new Azure ImageNew-AzImage -ImageName $imageName -ResourceGroupName $rgName -Image $imageConfig#endregion |
At this point, we have a viable Windows Server 2022 image that you can use to start deploying virtual machines on Azure.
Thank you!
Thank you for reading through this blog post. I hope I have been able to assist you in creating an offline image for Windows Server 2022 and uploading it to Azure.
If you encounter any new insights, feel free to drop me a comment or contact me via mail or other social media channels